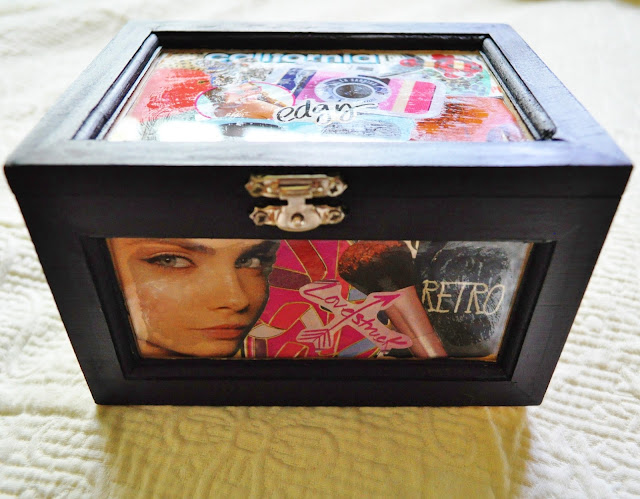
Hello lovelies! If you regularly read this blog (or if you just read the title of it....either one) then you know I always always always post about FASHION and BEAUTY and anything and everything related to that sphere. I never post about LIFESTYLE, so this is going to be the first. I decided I needed a jewelry box - one that nobody else in the entire world could possibly have. And that, my wonderful readers, is the beauty of "homemade." Anyway, I bought a couple of boxes from Michael's Craft Store - just wooden boxes with glass windows - a while ago (they were to be my entertainment after AP testing, since I would have barely any homework once those classes were over with), but never got around to actually embellishing them. So, now that I've done ONE of the two boxes I bought, I decided I would post it here, even though the topic is a bit different from my usual.
WARNING: THIS IS GOING TO BE A LONG POST
IT'S ALSO MY 50TH POST :) YAY
IT'S ALSO MY 50TH POST :) YAY
If you want to learn how to make something like THIS lovely thing (I say lovely not because I'm bragging, but because I'm immensely proud of myself, haha) then KEEP READING :)
WHAT YOU'LL NEED:
1. A wooden box with glass windows (this can be acquired at any craft store, but I went to Michael's)
2. Mod Podge (for the decoupage part) and a Sponge Brush (I bought 2 brushes - one for decoupaging and one for painting)
3. PAINT for your box. I bought Martha Stewart Acrylic paint in two colors (because I have two boxes, but I'm only showing one to you all here), "Beetle Black" (High-Gloss), which is what I used for this tutorial, and "Seaweed" (Satin). I bought High-Gloss and Satin paints because they would give me the nicest looking surface, with just a bit of luster.
The last thing you'll need are clippings (from magazines, newspapers, a copy of your favorite book, etc.) that you can decoupage your glass windows with. I grabbed my stack of Seventeen magazines (I've saved them all - I have a few issues from 2008!) and started clipping. I cut out things that were visually appealing, things I loved (for example, sunglasses and heels), and things that described me - all of these criteria would ensure that this box was MY OWN. Be warned: this (the clipping and decoupaging) is the most tedious part of this project - it's where the perfectionist in all of us comes out, haha. Make sure you arrange each window the way YOU want it - after all, this is going to be YOUR box :)
DECOUPAGING YOUR BOX:
HERE'S WHAT I DID TO MAKE DECOUPAGING A LOT EASIER:
I cut out paper rectangles that were the exact size of the glass panels on my box. I then labeled them (as you can see here, hehe). I pulled out my magazine clippings and began to arrange them on the pieces of paper. When I found an arrangement I liked, I would dip my brush into the Mod Podge and paint a VERY light layer over the arrangement, focusing mostly on the edges of each image so that they would lightly stick together. MAKE SURE you don't put too much, because it might bleed through and end up sticking the panel of clippings to the piece of paper. A lot of times, all of the overlapping images would go outside of the margin of space I had for my glass window, so I made sure I got all of what I wanted within the white space of the paper. When the Mod Podge dried (it only takes about 20 seconds), I moved the paper on top of the magazine clippings (instead of under) and held it there. I took a pair of scissors and cut around the paper so that my clippings (all stuck together lightly from Mod Podge) were the exact rectangular dimensions of my glass window. I then discarded the white paper, applied a thicker layer of Mod Podge onto the clippings (and a bit on the inside of the glass window) and stuck my images to the INSIDE of the box.
NOTE: For the best results, use Windex or Green Works or any other type of glass cleaner on the panels of your box first - you don't want any unsightly fingerprints or marks stuck in between your images and the glass. GIRL, THAT WOULD NOT BE CUTE.
PAINTING YOUR BOX:
After the decoupage on the inside has dried, we're going to focus on the OUTSIDE of the box. Apply painter's tape to each window so that you don't get paint on them. YOU DON'T WANT TO HURRY UP ON THIS PART - it's important that you're careful and neat so that no paint bleeds through onto the glass and covers the beautiful decoupaging you just worked so hard on!
NOTE: If you don't plan on distressing your box (like I did), it's important that you smooth the wood of your box by SANDING it. This will allow the paint to take easier to the wood, soften the texture of the raw wood, and overall make it more attractive. If you plan on distressing your box, however, you don't have to sand it until after your paint is dry - that way you only need to sand it ONCE.
After your box is painted (be careful around the hardware, like the clasp and hinges - if you happen to get paint on them, you can use a damp paper towel to wipe it off, but don't do this until the paint around the hardware is at least semi-dry) and dry, remove the tape from the glass. If you don't plan on distressing your box or adding any other touches, this is your finishing step!
Here's my box WITHOUT the distressing. The finish looks a little bit rough because it hasn't been sanded.
DISTRESSING YOUR BOX:
(IF YOU WISH TO)
Distressing is simple: take a piece of sandpaper and just begin sanding away over your DRY paint. Slowly, the paint will begin to rub off, revealing the unfinished look of the wood under. Distressing also serves as your sanding step, which makes the wood smooth to the touch and more attractive to look at - don't just do this step until you THINK the desired amount of distressing is reached. Make sure you sand your box so that it's smooth all around. I even rounded the corners a bit to add to the "antique" vibe. REMEMBER, your box is going to look amazing either way, so if sanding it properly distresses it more than you originally planned for it to, don't freak out - this effect is always going to look perfect because it doesn't NEED to be perfect. Neat, huh?
ALRIGHT LOVELIES, THAT'S ALL FOR THIS POST
I know that was a long one, so thanks for bearing with me and reading until the end :) Let me know in the comments section is you tried this out (post a picture, too! I would love to see your amazing creation :)
Love you all
<3


